Configuring Cluster Services with Server 2008
Some
people might wonder whether it is better to use Server 2008 over Server
2003. This is logically true. There are enhancements with the
clustering services, now called Failover Clustering, that can assist
you in creating a more stable and secure cluster for CCR. Some of the
new features are multiple subnets, support for geo-clusters, failover
across two subnets, and support for IPv4 and IPv6.
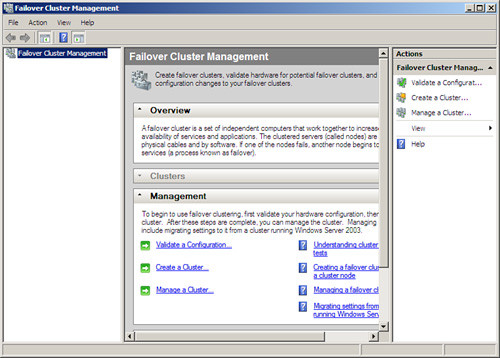
In addition, there is a new Failover Cluster Management console based upon the MMC 3.0 changes, shown in Figure 1.
There is a new quorum model that allows four different hybrids from which to choose:
Node Majority—
For use with clusters with an odd number of nodes (for use with
clusters of three or more), which is really only helpful in an SCC
situation (even though you can use it for CCR, it isn’t practical
because you can use the file share witness and not waste an entire
system acting as a node).
Node and Disk Majority—
For clusters with an even number of nodes. Each node gets a vote, as
does the witness disk, which might reside on shared storage.
Node and File Share Majority—
For clusters with special configurations, which is the equivalent of
the Majority Node Set that we have with Server 2003, and the one we use
for CCR.
No Majority: Disk Only—
This is what they might call traditional shared quorum clustering. It
can sustain a failure of all the nodes except one. It cannot sustain a
failure of the quorum disk. (Note that although this option is
available, the instructions clearly say, “This configuration is not
recommended because the disk is a single point of failure.”)
To perform the preparation process for the CCR, setup on Server 2008 requires some of the same steps for Server 2003.
To configure cluster services, perform the following:
1. | You
should create a separate account for the cluster services and make that
account a member of the Exchange Server Administrators group or
Exchange Organization Administrators group. The account should also be
put in the local Administrators group for each node.
|
2. | On
a Hub Transport server in the same site as the clustered nodes, create
a folder and give it any name you like (within reason, such as
MNSCluster) and share that folder on the network. Set the share
permissions to Full Control for the cluster administrator’s account
that you created.
|
3. | Configure
your network adapters. You should have a public and private connection.
It’s recommended, for the sake of organization, that you properly label
these in your Network Connections so that you know which one you are
looking at quickly. You want to have static addresses for both the
public and private networks. The private network needs to use a
different IP addressing scheme, and Microsoft recommends the addresses
10.10.10.x for both (you can go with 10.10.10.10 and 10.10.10.11 for
the active and passive private connections). Check your binding order
on the network adapters, too (on the Adapters and Bindings tab of the
Advanced Settings for your connection) and put the Public connection to
the top of the binding order. Note that IPv6 is installed by default
with Server 2008, and you are welcome to work that, too. IPv6 is the
way of the future.
|
4. | On
a Server 2008 system, you have to add the Failover Clustering feature
from the Add Features Wizard through Server Manager. You want to ensure
you have IIS and PowerShell installed. The active and passive servers
still require all the same requirements for Exchange that they do for a
typical installation.
|
After
you have the prerequisites in place, you need to proceed with the
creation of the failover. To do this, perform the following:
1. | On the active server click Start, Administrative Tools, and then select Failover Cluster Management.
|
2. | This
will launch the Failover Cluster Management console. Under Management
you will see a link to Create a Cluster. Select that link.
|
3. | The
Create Cluster Wizard will launch. On the Before You Begin screen, you
are given information about the wizard and to ensure you are prepared
to move forward. When you have read the information, click Next.
|
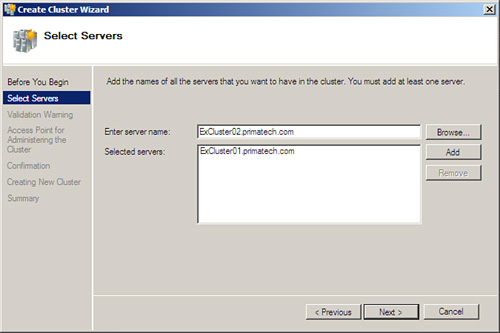
4. | On the Select Servers screen, shown in Figure 2,
you are asked to locate the servers you want for the cluster. In this
case, you should have two servers selected. Then click Next.
|
5. | You
are taken to the Access Point for Administering the Cluster screen. You
are asked to provide a cluster name (which is not the name of the
cluster that will be accessed by Outlook clients; that name is
configured when you perform the install of the active and passive
mailbox nodes). You are also asked to provide an IP address for
administrative connectivity. After these are set, click Next.
|
6. | From the Confirmation screen, you can confirm the settings you have chosen, and click Next.
|
7. | You
are able to watch the process as the new cluster is created. Then you
are taken to the Summary pane, where you can select View Report for a
detailed report of the process, and click Finish.
|
Now
that you have the failover cluster in place, certain aspects still need
to be configured. For example, you need to select which interface is
public and which is private (that is, for the heartbeat that lets each
side of the node know that the other is alive and well).
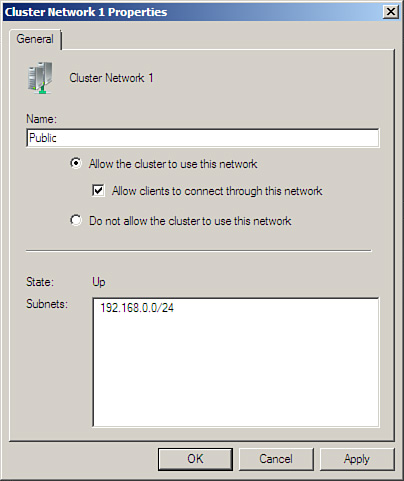
To
begin, open the Failover Cluster Management tool, expand Networks, and
then open the properties page of the public network interface, as you
can see in Figure 3.
You might want to make changes to the name to make it easily
identifiable as the public side. Then make sure you select the radio
button, Allow the Cluster to Use This Network, and the checkbox, Allow
Clients to Connect Through This Network.
Next,
open the private network interface and do the same, although deselect
the checkbox to allow clients to connect through this network.
Configuring
the File Share Majority quorum is easier in Server 2008 because there
is a wizard now. You still need to create the file share as we noted
earlier, typically on a Hub Transport server. Make sure the cluster
account receives the proper Full Control permissions over the share.
With the share created, you can open the wizard to configure the quorum
to use that model and to use the UNC for the share. Perform the
following:
1. | Open the Failover Cluster Manager on one of the two nodes.
|
2. | From
the Actions pane, select More Actions, and you will see the Configure
Cluster Quorum settings. Click this to open the wizard.
|
3. | To
begin with, you are shown the Before You Begin screen, where you can
read a bit about configuration of the quorum. When you are ready, click
Next.
|
4. | You are taken to the Select Quorum Configuration screen shown in Figure 4,
which has the four options we discussed earlier. The third one, Node
and File Share Majority (for clusters with special configuration), is
the one we want for the CCR cluster. Select that radio button and click
Next.

|
5. | Under
the Configure File Share Witness screen, you are asked to provide the
UNC path (or Shared Folder Path) to the folder you shared out. Type
that in, or Browse for the location, and click Next.
|
6. | The Confirmation screen simply asks you to verify the cluster quorum. Click Next.
|
7. | After the configuration completes, click Finish.
|
The next part of the process is to validate the cluster functions properly. To do this, perform the following:
1. | Open the Failover Cluster Manager on one of the two nodes.
|
2. | From the Management section, click the Validate a Configuration link to open the wizard.
|
3. | The Before You Begin screen provides information on the validation process; you can read through this and click Next.
|
4. | You are asked to select a set of servers to validate. Choose the two servers in your cluster and click Next.
|
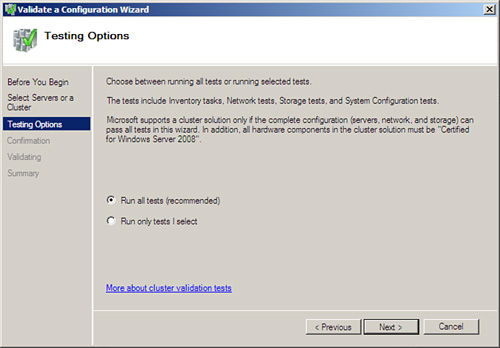
5. | You are taken to the Testing Options screen, shown in Figure 5.
You are given the option to run all tests or run selected tests. It’s
your decision, but perhaps the first time you should run all tests
(which is recommended) and click Next.
|
6. | You
are taken to the Confirmation screen, and you can see the list of tests
that will be performed on your systems. When ready, click Next.
|
7. | The
Validating screen displays. You see your cluster as it is put through
one test after another, and you can see the results, shown in Figure 6.
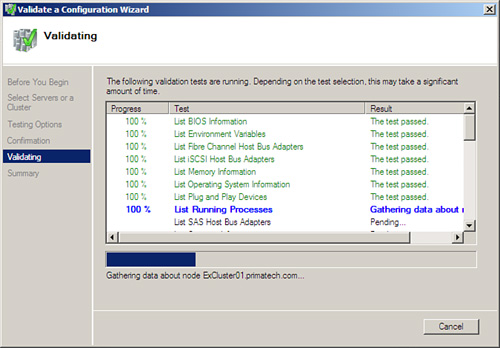
|
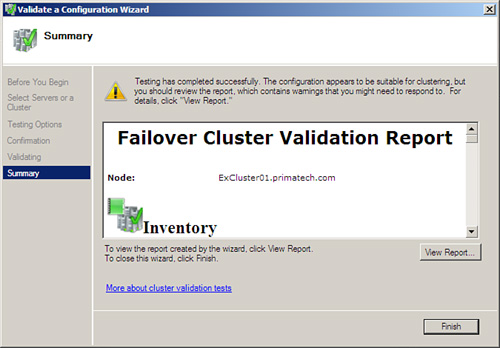
8. | After completion, you are taken to the summary page, where you can scroll through and see a report of the process (shown in Figure 7). You can also click View Report to see a detailed report of the testing. When you are done, click Finish.
|
At
this point, you are ready to perform the installation of Exchange 2007
for the Mailbox server roles for the active and passive side.
The installation begins like a typical installation:
1. | Insert
the DVD or mount the ISO for the Installation screen to display. Select
the link from Step 4 to begin the Installation Wizard.
|
2. | You are taken to the Introduction screen. Select Next.
|
3. | You are taken to the License Agreement screen. Choose I Accept the Terms in the License Agreement, and select Next.
|
4. | You are taken to the Error Reporting screen. Make your choice before selecting Next.
|
5. | This
brings you to the Installation Type screen, where you can choose either
a typical or custom Exchange Server installation. In this case, select
Custom Exchange Server Installation.
|
6. | Under
Server Role Selection, select Active Clustered Mailbox Role. The
Management Tools are selected by default. Select your options and
choose Next.
|
7. | Under
Cluster Settings, choose the Cluster Continuous Replication option. You
also need to provide the CMS. Your Outlook clients use this name to
connect to the server. You can alter the path to the Clustered Mailbox
Server database files if you like by choosing the Browse button. When
you are ready, click Next.
|
8. | On
the Cluster IP Address Configuration screen, you have the ability to
define more than one subnet. You can determine the use of IPv4, IPv6,
or both. (Note that it is possible to use a DHCP assigned address, but
it is not recommended.) When complete, click Next.
|
9. | The
Readiness Checks screen checks to make sure your system is ready for
the installation of the server options you’ve chosen. After you are
clear to move forward, choose Install.
|
10. | The
Progress screen walks you through the process of the actual
installation. When complete, it takes you to the Completion screen and
shows you what has been installed successfully. Click Finish.
|
After
you have the active side installed, you next step is to install the
Passive Clustered Mailbox role. Follow the same steps but choose the
passive mailbox.
Making Changes to the Transport Dumpster
In the RTM of Exchange 2007, you could configure the transport dumpster through the EMS using the Set-TransportConfig cmdlet. However, in SP1 there is a GUI method now through the EMC.
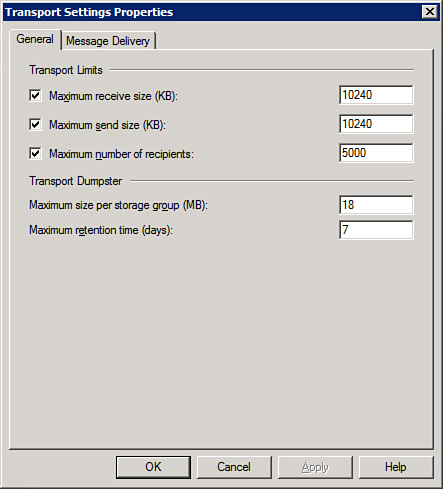
The
default configuration for the dumpster is to have the Maximum Size Per
Storage Group (MB) option set at 18 and the Maximum Retention Time
(Days) option set at 7. If you feel the need to alter this, you can. To
do this, you go through the Organization Settings work center, click
the Hub Transport node, and under the Global Settings tab you can view
the properties of the Transport Settings. On the General tab (shown in Figure 8), you can make changes.
Note
Microsoft
recommends you set the maximum size to 1.5 times the size of the
maximum messages allowed through your system. So, a size limit of 10MB
would be a transport dumpster size of 15MB. Microsoft recommends seven
days of retention time. So, overall, the defaults are probably fine
depending on your maximum message size allowed.
Confirm the CCR Cluster Is Performing Properly
With
the RTM version of Exchange, we had to use the EMS to determine whether
our CCR cluster was healthy, but now there are ways to check within the
EMC. For example, much like with LCR, you can view the properties of
the server, and there is now a Clustered Mailbox tab. This shows you if
the cluster is online and which node is active.
If
we view the properties of the storage group, we can see a new Cluster
Continuous Replication tab and see whether our Copy status is healthy.
A
new wizard in SP1 called the Manage Clustered Mailbox Server Wizard
allows you to move the mailbox to another node, and stop or start the
clustered mailbox server. This wizard can be located in the Actions
pane if you select the CMS from the Server Configuration work center.